
Trees
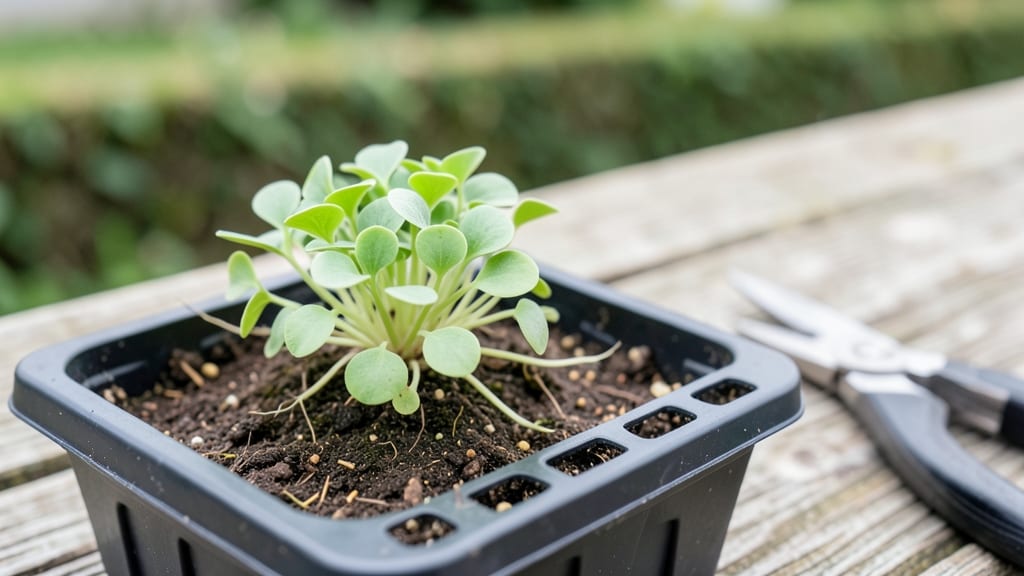
The identification of an alyssum seedling starts with those tiny, rounded leaves and delicate stems—if you’ve ever stared at a tray of seedlings wondering which ones are the right variety, you’re not alone. 🌱 The key lies in the leaf shape (some varieties have slightly lobed edges) and the stem color (healthy seedlings often have a faint purple tint when young).
I’ve learned to check for these details before they get crowded in their trays, because once they’re transplanted, it’s too late to tell them apart.
Most alyssum seedlings share a similar look, but varieties like ‘Sweet Alyssum’ have slightly larger leaves with a waxy texture, while ‘Tumbling Alyssum’ stays compact with smaller, tighter foliage. The spacing between leaves also matters—healthy seedlings grow them evenly along the stem, while weak ones might have gaps or yellowing.
I’ve found that using a small magnifying glass helps spot these differences when seedlings are still small.
Once you’ve identified the right seedlings, you’ll want to transplant them carefully to avoid damaging those tender stems. Use a mix of potting soil and perlite for drainage, and keep them in a shaded spot for the first week to reduce stress.
The payoff? Within just a few weeks, you’ll have a carpet of fragrant blooms that attract pollinators and fill your garden with color.
If you’re still unsure, compare your seedlings to photos of mature plants—sometimes the leaf shape changes as they grow, but the overall pattern stays the same. And if you’re growing multiple varieties, label them right away to avoid confusion later.
Trust me, a little extra care at this stage means fewer headaches when it’s time to enjoy your garden’s sweetest scent.
Mistakes Behind Misidentification
Accurately identifying alyssum seedlings can be tricky, especially when subtle differences lead to confusion. Understanding the root causes behind misidentification helps gardeners and botanists spot errors early. Below are the most common reasons why seedlings might be mislabeled or overlooked, along with the science behind them.
Young alyssum seedlings often lack the defining traits of mature plants, making identification unreliable. During the early stages—typically the first 2–4 weeks after germination—the leaves are small, undifferentiated, and may resemble other broadleaf seedlings (like mustard greens or brassicas).
- Why it happens: Seedlings prioritize root and stem development over leaf specialization, delaying the emergence of lobed or serrated edges that distinguish mature alyssum varieties.
- Scientific note: The Brassicaceae family (which includes alyssum) exhibits heterophylly—a phenomenon where leaf shape changes dramatically as the plant matures. Early leaves are often simple and rounded, while later leaves develop intricate lobes or hairs.
- Actionable fix: Wait until seedlings reach the 2–3 true leaf stage (not cotyledons) before attempting identification. Use a magnifying glass to examine leaf margins and vein patterns.
Alyssum seedlings’ colors can shift dramatically based on light exposure, soil nutrients, and even the angle of observation. What looks like a variegated or purple-tinged seedling in morning sunlight might appear uniform green by afternoon.
- Why it happens:
- Anthocyanin production: Low light or stress triggers anthocyanins (pigments that create red/purple hues), masking true leaf color. This is common in Alyssum maritimum (sweet alyssum) seedlings.
- Chlorophyll variation: Young leaves have less chlorophyll, making them appear paler or yellowish until photosynthesis ramps up.
- Soil pH effects: Acidic soils (< pH 6.0) can cause chlorosis (yellowing), while alkaline soils (> pH 7.5) may enhance purple tones.
- Actionable fix:
- Observe seedlings under natural daylight (10 AM–2 PM) for consistent color assessment.
- Use a pH test kit to adjust soil conditions if seedlings appear unnaturally discolored.
- Compare against a reference chart of mature alyssum varieties under the same lighting.
Alyssum plants are notorious for hybridizing, especially in mixed garden beds or when grown near wild relatives like Berteroa incana (hoary alyssum). Seedlings from cross-pollinated flowers may inherit traits from multiple parents, creating unpredictable leaf shapes, stem textures, or growth habits.
- Why it happens:
- Open-pollinated flowers: Alyssum’s tiny, fragrant blooms attract bees and butterflies, facilitating cross-pollination even between different Alyssum species.
- Genetic dominance: Some traits (like hairy stems or deeply lobed leaves) may skip generations, emerging only in F1 or F2 seedlings.
- Environmental stress: Drought or poor soil can increase mutation rates, leading to "sports" (aberrant seedlings) that don’t match parent plants.
- Actionable fix:
- Isolate alyssum varieties by at least 10 feet if breeding purity is critical.
- Start with certified true-to-type seeds from reputable suppliers to minimize hybrid risks.
- Document parent plants and growing conditions to trace unusual seedlings back to potential pollinators.
Alyssum seedlings can be easily mistaken for other plants in the Brassicaceae family, such as Arabis (rock cress), Iberis (candytuft), or even weeds like Cardamine (bittersweet). These look-alikes share compact growth habits and small flowers but differ in critical details.
| Trait | Alyssum | Look-Alike (Arabis) | Look-Alike (Iberis) |
|---|---|---|---|
| Leaf Arrangement | Alternate or basal rosette | Basal rosette with toothed edges | Basal rosette with smooth or slightly lobed leaves |
| Stem Texture | Often hairy or glandular | Smooth or slightly hairy | Stiff, woody stems |
| Flower Clusters | Flat-topped (corymb) with tiny, fragrant blooms | Upright spikes (raceme) with 4-petaled flowers | Flat-topped but denser, with 4 distinct petals |
Why it happens: Many Brassicaceae plants share evolutionary adaptations (e.g., small flowers to attract pollinators, compact growth to conserve water). Without close inspection, their seedlings can appear nearly identical until flowering.
Actionable fix:
- Check for leaf pubescence (hairiness)—a key trait in alyssum.
- Wait for flowering stage (if possible) to confirm petal structure.
- Use a dissecting microscope to examine leaf venation patterns.
By recognizing these common pitfalls, you’ll sharpen your ability to distinguish alyssum seedlings from imposters and hybrids. Pro tip: Keep a seedling journal with sketches and notes—it’s the fastest way to spot patterns in misidentifications over time! 📝✨
Quick fixes for seedling confusion
Struggling to tell apart tiny alyssum seedlings can feel like solving a puzzle with missing pieces—but don’t worry! With a few targeted fixes and smart prevention strategies, you’ll soon master seedling identification like a pro. Below, we break down common challenges and the simplest solutions to keep your garden thriving.
If seedlings have nearly identical leaf shapes, making a match can be tricky. Here’s how to sharpen your eye:
🔥 Compare Leaf Patterns Under Light
- Fix: Place seedlings near a bright window or use a magnifying glass to spot subtle differences in leaf texture, veins, or edges.
- Prevent: Take reference photos of mature plants before sowing.
Compare seedlings to these images daily. - Pro Tip: 💡 Alyssum varieties like A. maritimum have rounded leaves, while A. montanum often has slightly serrated edges—check for these clues early.
🍳 Test the Stem Color Trick
- Fix: Gently tug a seedling to expose its stem. Healthy alyssum stems range from light green to purplish-red (depending on the variety).
A pale or yellowish stem may signal stress or disease. - Prevent: Use a small notebook to log stem colors alongside leaf shapes for each batch of seedlings.
If some seedlings lag behind or stretch oddly, they might need a growth boost—or a closer look.
👨🍳 Adjust Light and Watering
- Fix:
| Issue | Solution |
|---|---|
| Leggy seedlings (stretching upward) | Move trays to a south-facing window or use a grow light 6 inches above for 12–14 hours daily. |
| Wilting or yellowing leaves | Water from the bottom (place trays in shallow dishes of water for 10–15 mins) to avoid fungal issues. |
- Prevent: Use well-draining seed-starting mix and avoid overcrowding trays. Thin seedlings to 1–2 inches apart when they develop their first true leaves.
🥘 Fertilize Gently
- Fix: Wait until seedlings have 2–3 sets of true leaves before applying a diluted fish emulsion (5-5-5) at half-strength. Over-fertilizing can burn tender roots.
- Prevent: Label trays with sowing dates to track growth stages and avoid overdoing nutrients too soon.
Tiny invaders or infections can derail identification efforts. Act fast to save your seedlings.
🔪 Spot and Treat Common Threats
- Fix:
- Aphids or Spider Mites: Spray seedlings with a mix of 1 tsp neem oil + 1 tsp mild dish soap in 1 quart of water. Reapply every 3–4 days.
- Damping-Off (Fungal Rot): Remove affected seedlings immediately and repot healthy ones in sterilized soil. Add a thin layer of sand or perlite to improve drainage.
- Powdery Mildew: Wipe leaves with a 1:1 water-vinegar spray (50/50 mix) in the morning to prevent spread.
- Prevent: 🌡️ Keep humidity low (use a small fan on low setting) and avoid overhead watering. Space trays to allow airflow.
Short on time? These tricks speed up identification without sacrificing accuracy.
📊 Use a Simple ID Chart
- Fix: Create a cheat sheet with columns for:
- Leaf shape (round, lobed, serrated)
- Stem color (green, red, purple)
- Growth speed (fast/slow) Fill it out as seedlings emerge to spot patterns quickly.
🎯 Thin Early, Thin Often
- Fix: Remove weaker seedlings when they’re still small (use scissors to cut at soil level). This reduces competition and makes remaining plants easier to inspect.
- Prevent: 🔥 Sow seeds in modular trays (individual cells) to avoid transplant shock later.
With these fixes, you’ll turn seedling confusion into a clear, confident identification process. Next time you’re staring at a tray of tiny green sprouts, remember: the key is in the details—leaf by leaf, stem by stem. Happy gardening! 🌱
Frequently asked questions
How do I distinguish alyssum seedlings from other small green seedlings?
Look for tiny rounded leaves with slightly fuzzy edges and a basal rosette pattern. Alyssum seedlings also often have a faint purple tint on their stems when young. Compare them to reference photos of mature plants—early leaves may look similar to mustard greens or brassicas, but alyssum's hairy stems and flat flower clusters set them apart.
At what stage can I reliably identify alyssum seedlings?
Wait until seedlings have developed their 2-3 true leaves (not just the initial cotyledons). At this stage, you'll start seeing the characteristic rounded leaf shapes and subtle hairiness along the stems. Using a magnifying glass helps spot these details when seedlings are still small.
Why do my alyssum seedlings look different from the parent plant?
Young seedlings often lack mature plant characteristics due to heterophylly—their leaves change shape dramatically as they grow. Additionally, alyssum frequently hybridizes, so seedlings might inherit traits from nearby plants. Observe them for 2-3 weeks before making final identifications.
What should I do if I can't tell which seedlings are alyssum?
Create a simple identification chart with columns for leaf shape, stem color, and growth pattern. Take reference photos of mature plants and compare them daily. If still unsure, wait until flowering—alyssum's tiny, fragrant clusters will confirm the variety.
How can I prevent misidentifying alyssum seedlings?
Start with certified seeds from reputable suppliers and isolate varieties by at least 10 feet to prevent cross-pollination. Keep a seedling journal with sketches and notes, and always check for the key identifying traits: rounded leaves, hairy stems, and purple-tinged growth when young.