Propagation
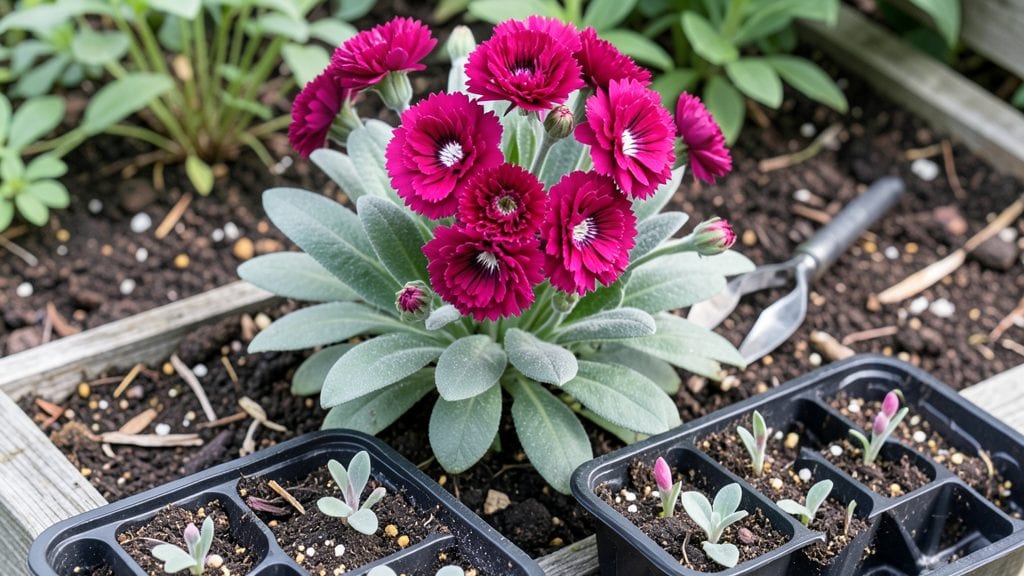
Planting dianthus seeds requires a little patience and the right timing—those tiny seeds need a cold snap to wake up before they’ll pop into life. 🌱 I learned the hard way that skipping the chill step means waiting months for germination, if they even sprout at all.
The secret is mimicking nature’s winter signal, which turns a finicky process into a reliable one.
You’ll need a shallow tray, sterile seed-starting mix, and a plastic bag for the cold treatment—basically, a DIY mini greenhouse. Sprinkle the seeds just below the surface (¼ inch deep) and keep them moist but not soggy.
After 4-6 weeks in the fridge, they’ll be ready to move into bright, indirect light where they’ll push through the soil in about 10-14 days.
Once those first green leaves appear, you’ll watch them transform into sturdy seedlings with fuzzy gray-green foliage. With proper spacing (2 inches apart) and gradual hardening off, you’ll have plants strong enough to transplant by late spring—just in time for their first burst of fragrant blooms.
This method works for both sweet Williams and cottage dianthus varieties, and it’s especially useful if you’re starting seeds in cooler climates. The key is consistency: don’t rush the chill period, and keep an eye out for damping-off (a fungal issue that looks like seedlings collapsing at the base).
📚 In This Guide
- What you need
- Instructions
- Tips and common mistakes
- Wrapping up and next steps
What you need
- ● Dianthus seeds: Choose heirloom or hybrid varieties (e.g., Dianthus chinensis or Dianthus barbatus). Start with 50–100 seeds for a small batch.
- ● Seed-starting mix: A lightweight, sterile potting mix (e.g., 50% peat moss + 50% perlite) to prevent damping off. 1–2 gallons per tray.
- ● Containers: Seed trays or flats with drainage holes (e.g., 10x20-inch tray for ~100 seeds).
- ● OR small pots (3–4 inches deep) for individual seedlings.
- ● Growing medium: Fine vermiculite or coconut coir (for moisture retention and aeration). ½ cup per tray.
- ● Spray bottle (with room-temperature water) for gentle seedling hydration.
- ● Clear plastic dome or plastic wrap to create a humidity tent (for germination).
- ● Grow lights or sunny windowsill: 12–16 hours of light daily (LED grow lights work best for seedlings).
- ● Chill method: Refrigerator (set to 34–40°F) for 2–4 weeks (required for cold stratification).
- ● OR a cool, dark basement (if no fridge space).
- ● Hand trowel or spoon for sowing seeds (avoid burying them—just press lightly into the soil!).
- ● Plant labels (write seed variety + date planted).
- ● Fertilizer: Balanced liquid fertilizer (5-5-5 or 10-10-10) at ½-strength after true leaves appear.
- ● Humidity tray (a shallow tray with pebbles + water to boost moisture).
- ○ Heat mat (optional) for faster germination (70–75°F after chilling).
- ● Pruning shears for thinning seedlings (once they’re 2–3 inches tall).
Step-by-step instructions for planting dianthus seeds
Here’s the foolproof method I’ve used to coax stubborn dianthus seeds into vibrant blooms—no guesswork, just results.
🌱 Step 1: Prepare the Seed Starting Mix and Containers
Fill your 4-inch deep containers with a light, well-draining mix—think 50% seed-starting mix and 50% perlite. Dianthus roots need air, and compacted soil will smother them. Moisten the mix until it’s damp like a wrung-out sponge, not soggy. Tap the container gently to settle the soil without packing it down.
Here’s the thing—dianthus seeds are tiny, so I use a shallow tray to hold multiple containers. This keeps humidity consistent and makes the next step easier. Spritz the surface with water until it’s evenly moist but not glistening. You want the soil to hold its shape when squeezed, not crumble apart.
💧 Step 2: Sow Seeds and Apply the Critical Chill Treatment
Scatter the seeds lightly on the soil surface—no need to bury them. Dianthus seeds need light to germinate, and pressing them too deep will delay sprouting. I use a toothpick to space them about ¼ inch apart, since they’re so small. Once they’re placed, mist the surface again with water until the soil looks uniformly damp.
This is the moment that matters: cover the tray with plastic wrap and place it in the refrigerator for 2-4 weeks. Yes, the fridge. Dianthus seeds require this cold stratification to break dormancy. Check weekly to ensure the soil stays moist—never let it dry out. You’ll see condensation on the plastic; that’s normal and a sign the humidity is right.
☀️ Step 3: Move to Warmth and Light for Germination
After the chill period, transfer the tray to a warm, bright spot—65-75°F is ideal. I place mine under a grow light on a seedling heat mat to speed things up. Germination can take 2-4 weeks, so patience is key. Watch for tiny green shoots to appear; they’ll look delicate, almost like tiny hairs at first.
Once the first true leaves appear (they’ll look like miniature versions of the adult plant), remove the plastic wrap. Keep the soil lightly moist—never soggy—by watering from the bottom. Bottom-watering prevents disturbing the fragile seedlings and ensures even moisture without fungal risks.
🌿 Step 4: Thin Seedlings and Harden Off for Outdoor Success
When seedlings have 2-3 sets of true leaves, it’s time to thin. Use a small pair of scissors to snip the weakest seedlings at soil level, leaving the strongest 2 inches apart. I know it’s tough to say goodbye to extras, but crowded dianthus will grow leggy and produce fewer blooms. After thinning, water deeply to help the remaining plants establish roots.
Two weeks before your last frost date, start hardening off the seedlings. Place them outside in a sheltered spot for 1-2 hours the first day, gradually increasing time over 10 days. You’ll see them adjust when their leaves perk up and they stop wilting. Once they’re ready, transplant them into your garden with 12 inches between plants—they’ll need room to spread and thrive.
✂️ Step 5: Maintain for Long-Lasting Blooms
After transplanting, water deeply once a week unless rain provides moisture. Dianthus hate soggy roots, so ensure your soil drains well. Deadhead spent blooms by snipping stems just above a set of leaves to encourage more flowers. I also add a low-nitrogen fertilizer every 4-6 weeks to support blooming, not leafy growth.
Here’s what you’ll love: dianthus reward patience. With the right start, they’ll bloom profusely for years, returning every spring with those classic pink, red, or white flowers. Just remember—no rushing. The chill treatment is non-negotiable, but once you’ve got it down, you’ll have a garden full of cheerful, long-lasting blooms.
Tips & tricks for perfect dianthus seed starting
Dianthus seeds are stubborn little things, but these tricks will help you coax them into vibrant blooms every time.
Soil Mix Secrets: The 50/50 blend of seed-starting mix and perlite isn't just about drainage—it's about creating the perfect airy environment dianthus roots crave. If you're short on perlite, you can substitute vermiculite in equal parts, but don't skip the air pockets. I've tried using regular potting soil, and the seeds either rot or take forever to germinate. The key is that mix should feel like a damp sponge when squeezed—not wet, not dry, but just right.
The Chill Treatment Isn't Optional: That 2-4 week refrigerator period is non-negotiable for dianthus. I've tried skipping it (don't make my mistake), and the seeds either never sprout or produce weak, leggy seedlings. Place a small dish of water in the fridge with your tray to maintain humidity, and check weekly—condensation on the plastic wrap means you're doing it right. If the soil dries out during this time, germination rates plummet dramatically.
Lighting Matters More Than You Think: While 65-75°F is ideal for germination, bright light is just as critical. I use a simple LED grow light on a timer (14 hours on, 10 hours off) to simulate natural daylight. If you're using natural light, place your seedlings within 6 inches of a south-facing window—they'll lean toward the light if they're not close enough. Once the first true leaves appear, remove the plastic wrap immediately to prevent fungal growth from excess moisture.
Thinning with Precision: When you're thinning to 2 inches apart, use a pair of clean scissors to snip at soil level rather than pulling. This prevents disturbing the roots of your remaining seedlings. I've found that the strongest seedlings are often the ones that emerge slightly later—don't thin too early just because some are bigger. Wait until you see 2-3 sets of true leaves on all seedlings before making your final cuts.
Pro Tips for Planting Dianthus Seeds
- Dianthus seeds are stubborn little things, but these tricks will help you coax them into vibrant blooms every time.
- Soil Mix Secrets: The 50/50 blend of seed-starting mix and perlite isn't just about drainage—it's about creating the perfect airy environment dianthus roots crave.
- The Chill Treatment Isn't Optional: That 2-4 week refrigerator period is non-negotiable for dianthus.
Frequently asked questions
Got questions about growing dianthus from seeds? You’re not alone—this delicate but rewarding process can feel tricky at first! Below, we’ve rounded up the most common queries to help you plant with confidence and troubleshoot like a pro.
When is the best time to plant dianthus seeds?
Dianthus thrives with a cold stratification period, so plant seeds 6–8 weeks before your last frost date (typically late winter or early spring). For fall blooms, sow seeds in late summer. If you’re in a warm climate, mimic winter by refrigerating seeds for 4–6 weeks before planting. Pro tip: Use a seed-starting kit with a built-in cooling system for convenience!
How do I cold-stratify dianthus seeds at home?
Cold stratification is key! Mix seeds with moistened perlite or sand, then place them in a sealed bag or container. Store in your fridge’s crisper drawer (34–40°F) for 4–6 weeks. After stratification, sow seeds ¼-inch deep in well-draining soil. Avoid freezing—check weekly for mold or dryness. Pro tip: Label your bag with the seed type and date!
Should I start dianthus seeds indoors or outdoors?
Start seeds indoors 8–10 weeks before transplanting for better control over conditions. Use small pots or trays with seed-starting mix, and place under grow lights (14–16 hours/day). Harden off seedlings for 1–2 weeks before moving outdoors. Outdoor sowing works in mild climates, but expect slower germination and higher pest risks. Pro tip: Use heat mats to speed up germination!
Why aren’t my dianthus seeds germinating?
Common culprits include lack of stratification, poor soil drainage, or temperature fluctuations. Ensure seeds are fresh (viability drops after 1–2 years), keep soil consistently moist (not soggy), and maintain 60–70°F during germination. If mold appears, reduce moisture and improve airflow. Pro tip: Try soaking seeds in lukewarm water for 24 hours before planting!
Can I grow dianthus from cuttings instead of seeds?
Take 4–6 inch cuttings from healthy stems in early summer, strip lower leaves, and dip in rooting hormone. Plant in sandy, well-draining soil and keep humid (use a plastic bag or propagator). Roots form in 3–6 weeks. Cuttings are faster than seeds but require more maintenance. Pro tip: Use a mix of perlite and peat moss for faster rooting!
How do I prevent damping-off disease in seedlings?
Damping-off is caused by fungal overwatering. To prevent it:
- Use sterilized soil or a seed-starting mix.
- Water from below (use trays) to avoid wetting leaves.
- Space seedlings 1 inch apart for airflow.
- Apply a fungicide spray (like neem oil) if needed.
Wrapping up and next steps
Planting dianthus seeds is a rewarding journey that unlocks a world of vibrant blooms with just a little patience and care! 🌸 By following the chill-and-germinate, you’ve set the stage for healthy, thriving plants.
Whether you’re a seasoned gardener or a curious beginner, the key takeaway is simple: consistency and the right conditions are your best tools.
Now that you’re armed with knowledge, it’s time to get your hands dirty! 🌱 Your next step? Start sowing those seeds—whether in cozy seed trays or a sunny garden bed. Watch as your efforts bloom into stunning, fragrant flowers that’ll make your green space shine. Happy planting!